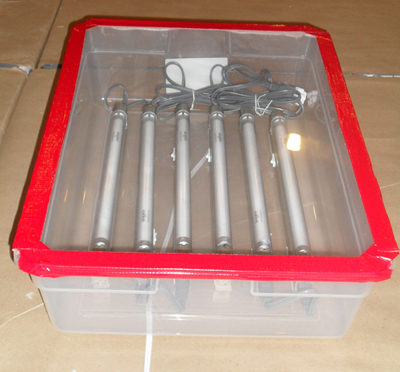
A lot of people have been excited recently about mobile silkscreen units, and the possibilities of setting up a simple silkscreen set-up most anywhere…I have done this in storefronts in Pittsburgh for RUST, at community centers and schools in Vitoria and Niteroi, Brazil, and most recently at the Allied Media Conference and US Social Forum in Detroit.
My cohort Heather White came up with this super-lightweight and easy-to-build design for a small, portable exposure unit. I have built several of them, one for an Educator’s event at Paper Politics in Pittsburgh. I made a handout for that event, and thought I’d share it here with the Justseeds public.
https://docs.google.com/fileview?id=0B7FeGEfhqgZlOWZiMjc0YWYtMjcwZC00YWQ5LWE2NDktZjA3YjNkMjE2MjU4&hl=en
This silkscreen exposure unit is extremely lightweight and portable, and was constructed from materials that we found at Home Depot and Mueller’s, our friendly neighborhood hardware store. We chose these lights because all the wiring is internal, and you can daisy-chain up to three of them together. With some searching, you can probably source this stuff even more cheaply. Here is what you’ll need:
SUPPLIES:
Hampton Bay Undercabinet lights (3-pack) 2 @ $28 ea.
28 Qt clear box with lid $6
3 feet sticky back Velcro $9
2-1 extension cord $2
16 x 22” 1/8” thick glass $12
Duct Tape $5
TOTAL $84
TOOLS:
Drill with bi-metal hole saw attachment
Utility Knife
HOW-TO
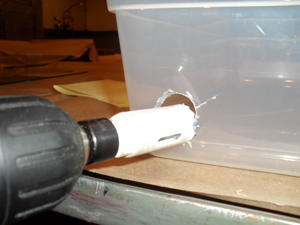
1. Use the attachment to drill a hole at one end of the box for the extension cord to feed out. You may need to use a utility knife to widen the hole.
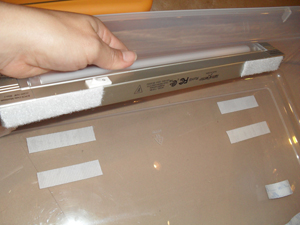
2. Plan out how your six lights will fit in the box. Cut strips of Velcro to fit one at either end of each light. Stick one side of the Velcro tape into the box, and one side on the lights.
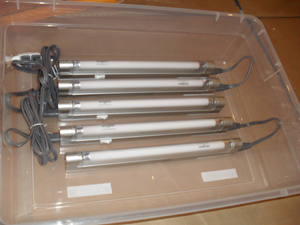
3. Use the cords included with the lights to attach them end to end in groups of three, and run the last cords to the extension cord.
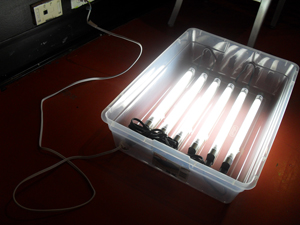
4. Switch all the lights to “on” and plug in the extension cord to test that they all are on and working. You will leave the switches in the “on” position, and plug and unplug the extension cord to use the exposing unit.
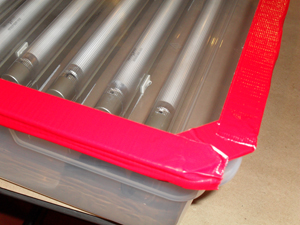
5. If you have access to a glass cutter, trim the corners off the glass. so that the lid fits over the glass when it is resting on the lip of the box. (If you can’t cut the corners, you just won’t have a lid that closes on the box. Not crucial). Run duct tape around all the edges of the glass, then tape the glass to the top of the box.
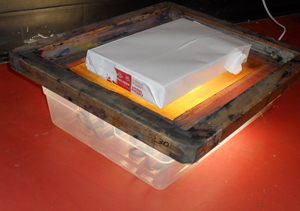
. To expose a screen, lay your transparency on the glass and your screen on top. Your image should be oriented how you want it to look when printed. Lay your coated screen on top and use books, packages of paper, or other flat, heavy objects to block out the top so no light seeps through.
Run some tests with timing—we have found that with most emulsions, this unit will expose a screen in 8 minutes.
Questions? Ideas?
Contact Mary Tremonte
or Heather White:
mary at justseeds.org
heatwhite at gmail.com
Download as a PDF






Thanks for posting this info! Be cool to see others make these little gems.
Good idea of light box.
Hey great idea for the light box. I have tried a couple things to get the best image and your box did the trick. thanks so much for the help
I can’t seem to find the lights you mention. Can you tell me how many watts/volts each bulb is so I can find something comparable. Thanks, a great idea I want to use for my class.