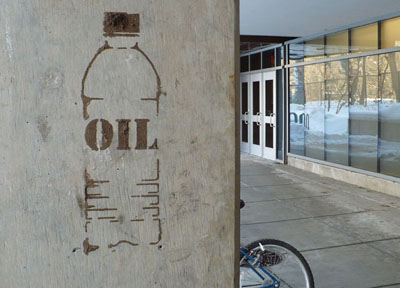
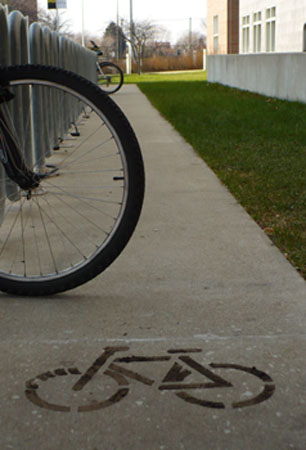
Milwaukee-based artist Jesse Graves created a number of mud stencils that he recently put up on sidewalks and the sides of buildings. Below is his “how-to-guide” and a link to his website with more images.
To avoid using toxic spray paint, I found a way to make mud stencils. Here is how you do it.
Materials: Mylar, X-Acto knife, tape, mud, sponge.
1. Design your stencil. Draw your stencil the size you want it, or design it on a computer and print it. Make sure you do not have islands (parts of an image that will fall out if you cut around them, like the middle of an O.) If you are using text, use a stencil font. If are using a computer print your design the size you want the stencil to be. If it is larger then 8X10 cut it apart in photo shop and print it in pieces, or enlarge it at a local copy store.
2. Cut it. Tape your design behind or in front of the transparent Mylar. Mylar is the same stuff used as transparencies for projectors, you can find a roll of it at art stores. Use the X-Acto knife to cut your deign out of the Mylar.
3. Get Mud. Find or make some mud. I mixed soil and water then beat it with a whisk. Make sure your mud is not watery. It should be about the same consistency as peanut butter.
4. Post it. Tape the stencil to whatever you want it on, it works on sidewalks or walls. If parts of the Mylar roll up put some tape under it. Then use the sponge to dab the mud on your stencil. Do not press too hard because if you squeeze muddy water out of the sponge it may sneak under the stencil.
5. Enjoy. Remove the tape on the outside of the stencil. Carefully remove the Mylar, and enjoy you non-toxic mud stencil.
This is still an experimental process. Post your comments, ideas, and pictures at http://mudstencils.wordpress.com/





Hey- I think this is a great idea… creativity is the key to opening the door to a healthy and happy future:)
I’ve used water based paints and spray chalk before, both of which are nicer to the environment. But mud certainly trumps those, now doesn’t it?
How long does the mud last typically? Do you find that this is the downside to using this medium?
Another way to tag with the earth 🙂
1 can of beer
1/2 teaspoon sugar
Several clumps garden moss
You will also need a plastic container (with lid), a blender and a paintbrush.
To begin the recipe, first of all gather together several clumps of moss (moss can usually be found in moist, shady places) and crumble them into a blender. Then add the beer and sugar and blend just long enough to create a smooth, creamy consistency. Now pour the mixture into a plastic container.
Find a suitable damp and shady wall on to which you can apply your moss milkshake. Paint your chosen design onto the wall (either free-hand or using a stencil). If possible try to return to the area over the following weeks to ensure that the mixture is kept moist. Soon the bits of blended moss should begin to recuperate into a whole rooted plant – maintaining your chosen design before eventually colonizing the whole area.